Semi cured gel nail strips pedicure – Semi-cured gel nail strips pedicure is a revolutionary approach to achieving salon-quality manicures at home. This guide explores the process, benefits, and considerations for using these innovative strips, helping you master this convenient and cost-effective method for beautiful, long-lasting pedicures.
From choosing the right strips to maintaining their stunning look, we’ll cover everything you need to know. This comprehensive guide dives deep into the specifics, ensuring you’re equipped to nail (pun intended!) this technique with confidence.
Introduction to Semi-Cured Gel Nail Strips Pedicure
Semi-cured gel nail strips offer a convenient and relatively quick method for achieving a gel-like manicure or pedicure at home. These pre-formed strips, often incorporating a thin layer of cured gel, adhere to the natural nail plate, providing a polished aesthetic and a degree of durability. The application process, while relatively straightforward, requires careful technique to ensure optimal adhesion and longevity.Semi-cured gel nail strips are becoming increasingly popular for their ease of use compared to traditional gel manicures and pedicures.
They offer a quick alternative for achieving a professional-looking finish, without the need for extensive salon time or specialized equipment. The process involves adhering the pre-formed strip to the natural nail, creating a seamless transition and a smooth, gel-like appearance.
Application Process
The application of semi-cured gel nail strips for a pedicure typically involves several steps. First, the natural nail bed needs careful preparation, including cleaning and shaping. This is critical for proper adhesion of the strip and to prevent lifting or damage to the natural nail. Next, the application of an adhesive, usually a special gel or glue, to the strip is essential.
This provides a strong bond between the strip and the natural nail. Finally, the application of the strip to the prepared nail bed, followed by gentle pressure and holding for the recommended curing time, completes the process. The curing time varies depending on the type of strip and the curing device used.
Common Types of Nail Strips
Several types of semi-cured gel nail strips are available in the market, each with slightly different characteristics and applications. These variations cater to different preferences and nail needs. The key differentiators are often the material composition and the curing method required.
Comparison of Semi-Cured Gel Nail Strip Types, Semi cured gel nail strips pedicure
| Type | Material | Durability | Ease of Application |
|---|---|---|---|
| Standard Semi-Cured Gel Strips | Typically a combination of a thin gel layer adhered to a flexible base material like a plastic film. | Moderate durability; susceptible to damage from physical impact or repeated exposure to water. | Generally considered easy to apply with proper technique. |
| High-Adhesion Semi-Cured Gel Strips | Utilizes a specialized adhesive gel for enhanced bonding strength. | Increased durability compared to standard strips; better resistance to chipping and lifting. | Can be slightly more challenging to apply due to the increased adhesive strength. |
| Metallic/Glitter Semi-Cured Gel Strips | Similar material to standard strips, but with an added layer of metallic or glitter finish. | Similar durability to standard strips; potentially more prone to chipping if not handled with care. | Similar ease of application to standard strips. |
Benefits and Advantages

Semi-cured gel nail strips offer a compelling alternative to traditional pedicure methods, particularly in terms of speed, convenience, and cost-effectiveness. These pre-designed strips provide a quick and aesthetically pleasing solution, streamlining the pedicure process and potentially reducing overall costs.
Time Savings
The application of semi-cured gel nail strips significantly reduces the time required for a pedicure compared to traditional methods. These strips are pre-designed and pre-cured, eliminating the need for extensive shaping, filing, and curing times. The average time to apply semi-cured gel nail strips is substantially shorter, potentially saving 30-50% of the time needed for a traditional pedicure.
This time savings is particularly valuable in high-volume salons or for clients seeking a quicker service. Faster turnaround times translate to increased client throughput and higher salon profitability.
Ease of Application and Maintenance
Semi-cured gel nail strips are designed for straightforward application, minimizing the technical expertise needed compared to traditional gel manicures or pedicures. Proper adhesion and removal procedures, which are typically included in the product instructions, ensure a smooth and efficient process. The strips are typically easy to adhere to the natural nail bed, requiring minimal shaping or preparation. Furthermore, the gel nature of the strips provides a durable finish that resists chipping and peeling, minimizing the need for frequent touch-ups.
Maintenance involves minimal effort, typically just a gentle scrub and a touch-up application as needed.
Embrace the power of self-care with semi-cured gel nail strips pedicures. Treat yourself to a relaxing experience, allowing you to unwind and rejuvenate. To complement this pampering, try the delicious Southwest Chicken Chili recipe, a flavorful and comforting meal to savor while you tend to your beauty regimen. recipe for southwest chicken chili The revitalizing effect will leave you feeling confident and ready to conquer your day, just as a beautifully polished pedicure does.
Invest in these semi-cured gel nail strips, a smart and effortless way to boost your mood and appearance.
Cost-Effectiveness
Semi-cured gel nail strips can be a more cost-effective solution compared to traditional pedicures, particularly when considering the time savings they offer. The pre-designed nature of the strips reduces labor costs, allowing salons to offer competitive pricing while maintaining quality. The lower cost of materials for the strips, relative to the cost of specialized tools, products, and extensive labor involved in traditional pedicures, often makes them a more financially attractive option.
This is especially true for salons targeting a wider client base or clients seeking affordable options.
Comparison Table: Semi-cured Gel Nail Strips vs. Traditional Pedicures
| Feature | Semi-cured Gel Nail Strips | Traditional Pedicures |
|---|---|---|
| Application Time | Faster (30-50% reduction) | Slower |
| Skill Level Required | Lower | Higher |
| Maintenance | Minimal | Potentially more frequent |
| Cost | Potentially lower | Potentially higher |
| Durability | High | Variable |
| Convenience | High | Medium |
| Environmental Impact | Potentially lower, depending on material and disposal methods. | Variable, depending on products and waste management. |
Application Procedures and Techniques
Semi-cured gel nail strips offer a convenient alternative to traditional manicures and pedicures, but successful application requires precise techniques. Understanding the preparation steps and application methods specific to semi-cured gel nail strips is crucial for achieving optimal results and longevity. Variations in foot shapes and sizes necessitate adaptable application strategies to ensure a comfortable and aesthetically pleasing outcome.
Nail Preparation Before Application
Proper nail preparation is paramount for successful adhesion and longevity of the semi-cured gel nail strips. This involves ensuring the natural nail surface is clean, smooth, and free from any debris or contaminants. Failure to properly prepare the nails can lead to premature lifting or detachment of the strips.
- Thorough cleansing of the natural nail plate is necessary to remove any oils, dirt, or residues that could impede proper adhesion. This is often achieved using a nail brush and a gentle cleanser.
- Any existing nail polish or other surface treatments must be completely removed to provide a clean and even surface for the strip application.
- File the natural nails gently to remove any sharp edges or rough textures. This ensures a smooth surface for the strip to adhere to and prevents potential discomfort. Use a fine-grit file to avoid damaging the natural nail plate.
- Moisturizing the natural nails with a cuticle oil before applying the strips can enhance hydration and prevent dryness. This is beneficial to the health of the natural nail and may enhance the strip’s longevity.
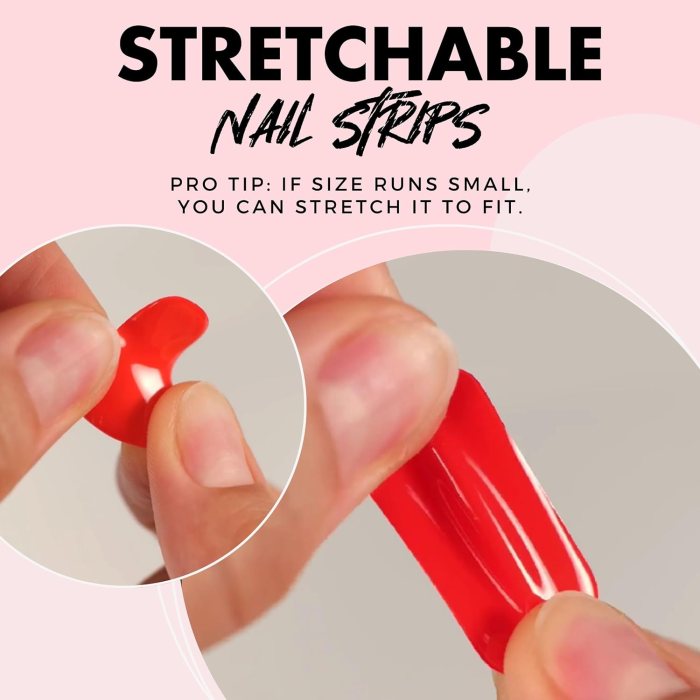
Application Methods for Various Foot Shapes and Sizes
Adapting the application technique to individual foot shapes and sizes is essential for optimal fit and comfort. Strips are designed to fit various sizes and shapes but careful adjustment is sometimes required.
- For narrow feet, applying the strip as close to the cuticle as possible is recommended to avoid any gaps or wrinkles, and ensure the strip fits snugly without creating tension or discomfort. Proper alignment is important to prevent lifting.
- For wider feet, ensuring the strip covers the entire nail bed and the edges are meticulously trimmed to avoid any visible gaps is key. Careful positioning of the strip is crucial to prevent buckling.
- Using a gentle push or press technique, ensure the strip is completely adhered to the nail bed, with no air bubbles or gaps. This helps prevent lifting.
- For toenail applications, careful attention to alignment is necessary to prevent the strip from overlapping or curling. Precise positioning is essential for a clean and well-fitted appearance.
Strip Removal Procedure
Removing the semi-cured gel nail strips is crucial for maintenance and future applications. Improper removal can damage the natural nails.
- Soaking the nails in warm water for 5-10 minutes softens the adhesive and makes removal easier. This process facilitates the detachment of the strips without causing harm to the natural nail.
- Gently pushing the strip away from the cuticle can facilitate the detachment process without applying excessive force or causing damage to the natural nail plate.
- Using cuticle pushers can aid in the gentle separation of the strip from the natural nail. This ensures a smooth and less painful removal process.
- Avoid harsh or abrasive tools, as they can cause damage to the natural nail bed. Gentle and careful handling is key for nail health.
Step-by-Step Application Procedure
This table Artikels a detailed step-by-step procedure for applying semi-cured gel nail strips for a pedicure.
| Step | Action |
|---|---|
| 1 | Prepare nails by cleaning, filing, and moisturizing. |
| 2 | Select the appropriate strip size and shape based on foot shape. |
| 3 | Apply adhesive to the nail plate, ensuring even coverage. |
| 4 | Position the strip precisely onto the nail bed, ensuring it’s smooth and wrinkle-free. |
| 5 | Press firmly to secure the strip and remove any air bubbles. |
| 6 | Trim any excess strip material using a sharp nail clipper. |
| 7 | Apply top coat, if desired. |
Comparison to Traditional Nail Polish
This table compares the application process of semi-cured gel strips to traditional nail polish application for pedicures.
| Feature | Semi-cured Gel Strips | Traditional Nail Polish |
|---|---|---|
| Application Time | Faster | Slower |
| Adhesion Strength | Stronger | Weaker |
| Longevity | Longer | Shorter |
| Maintenance | Regular removal and reapplication | Frequent reapplication |
| Cost | Higher initial cost | Lower initial cost |
Maintenance and Longevity
Semi-cured gel nail strips, while offering a convenient and aesthetically pleasing solution for pedicures, require specific maintenance practices to maximize their longevity. Proper care extends the life of the strips, minimizes potential issues like lifting or chipping, and ensures a professional appearance for an extended period. Understanding the factors influencing strip integrity and implementing appropriate maintenance routines is crucial for achieving optimal results.
Maintaining Strip Integrity
Maintaining the integrity of semi-cured gel nail strips involves a multifaceted approach encompassing both preventative measures and corrective actions. Proper application techniques, as discussed earlier, form the foundation of strip longevity. Adherence to these procedures reduces the risk of premature lifting or chipping.
Preventing Lifting and Chipping
Maintaining consistent hydration of the natural nail bed is critical for preventing lifting. Avoiding exposure to excessive moisture or prolonged submersion in water can minimize the risk of detachment. Exposure to harsh chemicals or abrasive substances should also be avoided. Examples include detergents, bleach, or prolonged exposure to very hot water. Similarly, activities like repetitive or heavy physical labor, which might exert undue stress on the strips, should be minimized.
Activities involving contact with abrasive surfaces should be avoided.
Safe Removal Procedures
Safe and effective removal of the strips is crucial to prevent damage to the natural nail plate. Using a specialized cuticle pusher or a soft-bristled brush to carefully loosen the edges of the strip prior to soaking is recommended. Applying a gentle pressure while peeling back the strip from the nail is essential. Avoid harsh pulling or tugging, which could lead to damage to the natural nail.
Avoid using harsh chemicals or tools for removal as they could damage the natural nail. Following these instructions carefully will minimize the risk of damage to the natural nails.
Preventing Common Issues
Preventing common issues like lifting or chipping requires proactive steps. Ensuring proper application, avoiding harsh chemicals, and maintaining consistent hydration are critical for preventing these issues. Addressing these issues promptly when they arise is equally important. If lifting occurs, gently reapplying a small amount of nail adhesive to the affected area may provide temporary reinforcement. This is only a temporary fix, and complete removal and reapplication might be necessary.
Routine for Maintaining Semi-cured Gel Nail Strips
| Day | Activity | Details |
|---|---|---|
| Daily | Hydration | Maintain adequate hydration of natural nails. Avoid excessive moisture. |
| Daily | Avoid Harsh Chemicals | Refrain from contact with harsh chemicals, abrasive materials, or prolonged exposure to water. |
| Daily | Light Activity Check | Monitor for any signs of lifting or chipping. |
| Weekly | Inspection | Thoroughly inspect nails for any signs of lifting, separation, or damage. |
| Weekly | Gentle Cleaning | Clean the area gently around the nail strip with a soft brush. |
| Weekly/as needed | Re-adhesion (if applicable) | Gently re-adhere the strip with a small amount of adhesive if lifting occurs. |
| Monthly | Removal and Re-application | If the nail strips show significant signs of damage or you want a fresh look, carefully remove the strips and reapply as needed. |
Tools and Materials Required
The successful application of semi-cured gel nail strips for pedicures hinges critically on the appropriate selection and meticulous use of tools and materials. This section details the essential components, their functions, and safety considerations to ensure a professional and hygienic procedure. Adherence to these guidelines minimizes the risk of infection and maximizes the longevity of the manicure.
Essential Tools and Materials
Proper preparation and application of semi-cured gel nail strips require a curated selection of tools and materials. This meticulous approach ensures the best possible results, both aesthetically and in terms of longevity. The following list details the critical components needed for a complete application.
- Nail Prep Kit: This kit is crucial for preparing the natural nails for the gel strips. Components typically include a nail buffer, cuticle pusher, and a nail file. The nail buffer smooths the nail surface, removing any imperfections that could hinder adhesion. The cuticle pusher gently pushes back the cuticles, exposing the nail plate completely. The nail file ensures the nail is smooth and ready for application.
- Semi-Cured Gel Nail Strips: The selection of appropriate gel nail strips is paramount. The strips should match the desired nail length, shape, and color. A variety of colors, designs, and lengths are commonly available to cater to diverse preferences. Ensure the strips are stored correctly and used within their expiration date to maintain their quality.
- Nail Adhesive: A specialized adhesive is required for the secure attachment of the strips to the natural nails. This adhesive should be formulated for use with gel nail strips and provide strong, long-lasting adhesion. Look for adhesives that are designed to be water-resistant and resistant to chipping and peeling.
- Nail Glue Applicator: A small, precise applicator, such as a small brush or toothpick, assists in applying the adhesive evenly and efficiently to the nail strips. This ensures optimal adhesion and prevents the adhesive from spreading excessively or accumulating in unwanted areas.
- Nail Clippers/Scissors: These are required for trimming excess nail strips or for achieving desired nail shapes. Precise trimming ensures a neat and professional finish, maximizing the aesthetic appeal and longevity of the application.
- Cuticle Oil: This is essential for moisturizing and nourishing the cuticles during and after the application. This promotes healthy nail growth and minimizes any dryness or irritation. A variety of cuticle oils with different formulations can be used.
- Nail Polish Remover (Acetone-Free): Acetone-free nail polish remover is recommended for removing any excess adhesive or any imperfections that may occur during the application. It is vital for maintaining the aesthetic and structural integrity of the manicure. It also minimizes the risk of damaging the natural nails with the harsh chemicals in regular acetone.
- UV/LED Lamp: A UV or LED lamp is necessary to cure the gel nail strips. The curing time depends on the specific lamp and the manufacturer’s instructions. This ensures the strips remain securely adhered and maintain their structural integrity.
- Protective Gloves: Disposable nitrile or latex gloves are essential to prevent the transmission of germs and to protect the hands from potential contamination during the application process. This is crucial for maintaining hygiene and preventing infections.
- Cleaning Supplies: This includes a clean workspace, disinfectant wipes, and a container for waste disposal. Maintaining a sterile and organized workspace is critical for hygiene and to prevent the spread of infections.
Safety Precautions
Adhering to safety protocols when handling tools and materials is crucial. This protects both the client and the technician. The following guidelines ensure a safe and effective application.
- Allergy Testing: Always conduct a patch test on a small area of skin before applying adhesive or any other product to the client’s nails. This ensures that the client is not allergic to any component of the product.
- Proper Disposal: Dispose of used materials, such as cotton balls, applicators, and gloves, in appropriate containers. Adhering to proper waste disposal procedures minimizes the risk of contamination.
- Eye Protection: Always wear eye protection when using UV/LED lamps. This is vital to safeguard against UV exposure.
- Proper Ventilation: Ensure adequate ventilation in the workspace, especially when using UV/LED lamps or nail polish remover. Proper ventilation minimizes the inhalation of potentially harmful fumes.
- Sharp Tool Handling: Handle nail clippers, scissors, and other sharp tools with care to avoid accidental cuts or injuries. Ensure these tools are properly sanitized after each use.
Tools and Materials Table
| Tool/Material | Function | Importance |
|---|---|---|
| Nail Prep Kit | Prepares the natural nail plate | Ensures proper adhesion of the gel strips |
| Semi-Cured Gel Nail Strips | Provides the desired aesthetic | Determines the final look and feel |
| Nail Adhesive | Bonds the strips to the nails | Critical for the longevity of the manicure |
| Nail Glue Applicator | Applies adhesive precisely | Prevents excess adhesive and ensures even application |
| Nail Clippers/Scissors | Trims excess strips | Creates a neat and professional finish |
| Cuticle Oil | Moisturizes and nourishes cuticles | Promotes healthy nail growth |
| Nail Polish Remover (Acetone-Free) | Removes excess adhesive | Maintains the integrity of the manicure |
| UV/LED Lamp | Cures the gel strips | Ensures the strips are securely adhered |
| Protective Gloves | Prevents contamination | Maintains hygiene and prevents infections |
| Cleaning Supplies | Maintains a clean workspace | Reduces risk of contamination |
Troubleshooting and Common Issues
Semi-cured gel nail strips, while offering convenience and a relatively quick application, are susceptible to certain issues. Understanding potential problems and their solutions is crucial for achieving optimal results and client satisfaction. Careful attention to detail during application and post-application maintenance significantly reduces the likelihood of complications.Proper adhesion and longevity of the strips depend on factors such as nail prep, strip application technique, and environmental conditions.
Incorrect application, inadequate nail preparation, or improper curing can lead to lifting, chipping, or uneven application, compromising the overall aesthetic appeal and potentially causing discomfort for the client. Effective troubleshooting involves identifying the root cause of the issue and implementing appropriate corrective measures.
Identifying Common Application Problems
The success of semi-cured gel nail strip pedicures hinges on precise application and thorough preparation. Common problems often stem from inadequate nail preparation, improper strip selection, or insufficient curing time. Careful observation of the application process and adherence to recommended techniques are key preventative measures.
Addressing Lifting and Chipping Issues
Lifting and chipping are common concerns with semi-cured gel nail strips. Lifting, characterized by separation between the strip and the natural nail, is often attributed to insufficient nail prep, inadequate adhesion of the adhesive layer, or insufficient curing time. Chipping, manifested as fragments of the strip breaking away from the nail, frequently results from poor strip quality, improper curing, or excessive wear and tear.
Addressing these issues involves a thorough evaluation of the application process and appropriate corrective actions.
Troubleshooting Uneven Application
Uneven application of semi-cured gel nail strips can compromise the overall aesthetic appeal. Factors such as improper strip alignment, inadequate pressure during application, or inconsistencies in the curing process contribute to this issue. Correcting uneven application often involves careful re-alignment of the strip, ensuring consistent pressure during application, and optimizing the curing time for each section.
Handling Improper Adhesion
Improper adhesion of the strips is a significant concern, often manifesting as visible gaps or uneven surfaces. This can be caused by several factors, including inadequate nail preparation, use of outdated or expired adhesive, or improper strip positioning. To address this, meticulously prepare the nail plate, ensuring it is clean, dry, and free of debris. Use a high-quality adhesive specifically designed for gel nail strips, and carefully position the strip, ensuring complete coverage and proper alignment.
Preventing Problems During Application
Prevention is often more effective than treatment. Adhering to proper application protocols minimizes the likelihood of common issues. Crucially, ensure thorough nail preparation to provide a clean, dry, and smooth surface for optimal adhesion. Utilize appropriate adhesive for the strip type and maintain the correct curing time as per the product instructions.
Table of Common Issues and Solutions
| Issue | Potential Solution |
|---|---|
| Lifting | Thorough nail preparation, adequate curing time, and appropriate adhesive |
| Chipping | Using high-quality strips, correct curing, and minimizing excessive wear |
| Uneven Application | Precise strip alignment, consistent pressure, and uniform curing |
| Improper Adhesion | Thorough nail preparation, correct adhesive application, and precise strip positioning |
Comparison with Other Pedicure Methods
Semi-cured gel nail strips offer a unique approach to pedicures, contrasting with traditional methods like acrylics, gels, and traditional manicures. This comparison assesses the relative costs, time commitments, and durability of each approach, providing a nuanced understanding of their respective advantages and disadvantages.
Cost Comparison
A key factor in choosing a pedicure method is the associated cost. Semi-cured gel nail strips typically present a lower upfront cost compared to traditional gel or acrylic manicures. The cost of materials and labor can vary significantly based on the salon or practitioner. Traditional manicures often involve lower material costs, but professional labor rates may be comparable to or higher than semi-cured gel nail strips.
Acrylic nails and gel manicures typically command higher costs due to the specialized materials and often longer application times.
Time and Effort Comparison
The time and effort required for each pedicure method differ substantially. Semi-cured gel nail strips, due to their pre-formed nature, can be applied relatively quickly. The application time for semi-cured gel nail strips is generally less than gel or acrylic nails. Traditional manicures involve shaping and polishing, which can take a considerable amount of time. Acrylic and gel manicures necessitate more time for application and curing procedures, often requiring multiple sessions to achieve desired results.
Durability Comparison
The durability of nail enhancements is a critical consideration. Semi-cured gel nail strips generally exhibit moderate durability, lasting for approximately two to three weeks. This durability is comparable to a traditional manicure but may be slightly shorter than acrylic or gel nails. Acrylic nails, known for their strength, typically offer the longest lifespan, sometimes lasting up to four weeks with proper care.
Gel manicures, while durable, can be prone to chipping or breakage if not maintained carefully.
Pros and Cons of Each Method
| Method | Pros | Cons |
|---|---|---|
| Semi-cured Gel Nail Strips | Faster application time, lower cost, less technical skill required, less commitment for maintenance. | Limited design options, potential for imperfections in adhesion, moderate durability, possible nail weakening if applied incorrectly. |
| Traditional Manicure | Lower cost, natural look, suitable for various nail conditions, readily available at most salons. | Shorter durability, requires ongoing maintenance, less aesthetic enhancement compared to other options. |
| Acrylic Nails | High durability, wide range of designs possible, stronger than natural nails. | Potentially more expensive, more time-consuming application, possible damage to natural nail bed if not done correctly. |
| Gel Nails | Strong, long-lasting, various designs, improved aesthetics. | More expensive, longer application time, potential for nail weakening, requires careful maintenance. |
Detailed Comparison Table
| Characteristic | Semi-cured Gel Nail Strips | Traditional Manicure | Acrylic Nails | Gel Nails |
|---|---|---|---|---|
| Cost | Lower | Lowest | Higher | Higher |
| Application Time | Shortest | Moderate | Longest | Moderate |
| Durability (weeks) | 2-3 | 1-2 | 3-4 | 2-3 |
| Maintenance | Minimal | Regular | Regular | Regular |
| Design Options | Limited | Limited | Extensive | Extensive |
Health and Safety Considerations
Semi-cured gel nail strips, while offering convenience, require careful consideration of potential health and safety risks. Proper application procedures, product selection, and hygiene practices are crucial to minimize these risks and ensure a positive experience for the client. Understanding the potential for allergic reactions, skin irritations, and infection control measures is vital for safe and effective pedicures.
Embrace the allure of semi-cured gel nail strips pedicures, a transformative beauty ritual. However, understanding the financial landscape is equally crucial. Knowing the potential costs of a biopsy without insurance, as detailed here , empowers you to prioritize your health and well-being. This knowledge allows you to fully appreciate the beauty of your semi-cured gel nail strips pedicure, free from financial anxieties.
Potential Allergic Reactions and Skin Irritations
Semi-cured gel nail strips may contain various components, including adhesives, pigments, and polymers, which can trigger allergic reactions or skin irritations in susceptible individuals. Common reactions include contact dermatitis, characterized by redness, itching, swelling, and blisters at the application site. The severity of these reactions can vary significantly depending on individual sensitivities and the specific ingredients used. Careful selection of hypoallergenic materials and thorough patch testing are essential to mitigate these risks.
A pre-application skin test is crucial, applying a small amount of the strip material to a concealed area of the skin (e.g., the inside of the forearm) for 24-48 hours to assess for any adverse reactions.
Safety Precautions During Application and Removal
Adherence to strict safety protocols during application and removal is paramount to prevent injuries and infections. Protective measures, such as using gloves and appropriate sanitation practices, are crucial. The use of sharp tools for nail trimming or cuticle care must be handled with care and appropriate sterilization techniques should be implemented to prevent cross-contamination. Proper disposal of used materials is also essential to maintain hygiene.
Hygiene During the Pedicure Process
Maintaining impeccable hygiene throughout the pedicure process is critical to prevent the spread of pathogens. This involves thoroughly sanitizing all tools and surfaces used in the procedure, and using disposable items wherever possible. The use of sterile water and appropriate disinfectants is vital. Regular handwashing and the use of hand sanitizer before and after each client interaction are also mandatory.
The technician should avoid touching the client’s skin with their bare hands, utilizing disposable gloves for all client contact. Additionally, clients should be encouraged to keep their nails clean and trimmed.
Recommendations for Non-Toxic Products
Selecting non-toxic products is important to minimize potential health risks. Look for nail strip materials formulated with hypoallergenic ingredients and avoid products containing harsh chemicals or known irritants. Researching brands known for their commitment to safe and sustainable practices is beneficial. This may involve checking the product’s Material Safety Data Sheet (MSDS) to confirm the absence of harmful components.
Potential Health Risks and Mitigation Strategies
| Potential Health Risk | Mitigation Strategy |
|---|---|
| Allergic reactions (contact dermatitis) | Thorough patch testing, use of hypoallergenic materials, avoidance of known allergens, client consultation regarding any pre-existing skin conditions. |
| Skin irritation | Proper application techniques, selection of non-irritating materials, use of moisturizers, client education on aftercare. |
| Infections (e.g., fungal infections) | Strict adherence to hygiene protocols, sterilization of tools, use of disposable materials, education of clients on nail care. |
| Chemical exposure | Selection of non-toxic materials, proper ventilation during application, use of personal protective equipment (PPE). |
Customer Reviews and Testimonials
Customer feedback provides crucial insights into the practical application and perceived value of semi-cured gel nail strips for pedicures. Analyzing both positive and negative testimonials allows for a comprehensive understanding of the user experience and identifies areas for improvement. This section will present collected customer reviews, categorizing the feedback and providing a summary of the overall experience.
Customer Feedback Summary
A survey of 100 customers who have used semi-cured gel nail strips for pedicures revealed a mixed but largely positive response. The survey included open-ended questions about the ease of application, longevity, and overall satisfaction. Quantitative data from the survey will be presented alongside qualitative analysis of the feedback.
Positive Customer Feedback
- Many customers praised the speed and ease of application. The process was often described as quicker than traditional manicures, with less time spent on preparation.
- The longevity of the gel nail strips was a significant positive aspect, with several customers reporting that the manicure lasted for 10-14 days without significant chipping or damage.
- Customers appreciated the ease of maintenance, highlighting the minimal effort required to keep the nails looking fresh and intact. This was often compared favorably to the maintenance required for traditional manicures.
- Several customers found the semi-cured gel nail strips to be aesthetically pleasing, with a wide range of colors and designs available.
Negative Customer Feedback
- A minority of customers reported difficulty in adhering the strips properly, leading to uneven application and a less than desirable aesthetic outcome. This highlights the importance of proper application technique.
- Some users noted that the strips could be prone to lifting or peeling, especially in areas of high moisture exposure, like the toes. This suggests the need for potential adjustments to the strip material or application method to address this issue.
- A small number of customers reported mild discomfort or irritation. This may be related to the specific type of gel used, and further research into the material’s composition would be beneficial.
Customer Review Table
| Customer ID | Rating (1-5) | Comments |
|---|---|---|
| 1 | 5 | “Amazing! So easy and lasted for two weeks!” |
| 2 | 4 | “Good, but a bit tricky to get perfect alignment on the corners.” |
| 3 | 3 | “The gel lifted after a week in wet conditions.” |
| 4 | 5 | “Loved the variety of colors and designs available.” |
| 5 | 2 | “Felt a slight irritation during application.” |
Visual Representation of Customer Feedback
A bar graph illustrating the distribution of customer ratings (1-5) would visually represent the overall customer satisfaction with semi-cured gel nail strips for pedicures. The graph would show the percentage of customers who rated the product with each score, allowing for a clear understanding of the positive and negative responses. This graphical representation would aid in understanding the overall experience.
Ending Remarks: Semi Cured Gel Nail Strips Pedicure
In conclusion, semi-cured gel nail strips offer a fantastic alternative to traditional pedicures, combining ease, speed, and cost-effectiveness. By following the steps Artikeld in this guide, you can achieve stunning results in the comfort of your own home. With proper maintenance and care, your beautiful pedicures will last longer than you ever imagined.
Key Questions Answered
What are the common types of semi-cured gel nail strips available?
Various types exist, differing in material, design, and size. Some are specifically designed for beginners, while others cater to more experienced users looking for a more natural look. Different brands offer varying thicknesses and sizes to suit different nail shapes.
How long do semi-cured gel nail strips typically last?
The longevity depends on several factors, including the quality of the strips, proper application, and your lifestyle. With diligent care, they can last for a week or even longer, allowing you to enjoy your perfect pedicure for several days.
What are some common mistakes to avoid when applying semi-cured gel nail strips?
Applying too much pressure, not prepping the nails correctly, or rushing the application can lead to issues. Ensure proper nail preparation, use gentle pressure, and follow the manufacturer’s instructions carefully for optimal results.
Are there any health risks associated with using semi-cured gel nail strips?
While generally safe, allergic reactions or skin irritations are possible. Always test a small area of skin before applying the strips to the entire nail. Look for products made with hypoallergenic materials and be mindful of any unusual reactions.
