Acrylic nail kit set professional with drill offers a powerful and precise approach to nail enhancement. This comprehensive kit, packed with various tools and components, allows for a wide range of creative nail designs. Understanding the nuances of this kit is crucial for both professional nail technicians and enthusiastic nail enthusiasts at home. It’s important to approach the use of this kit with the proper techniques and safety precautions in mind to ensure a positive experience and optimal results.
This detailed guide explores the features, benefits, usage, and safety considerations of a professional acrylic nail kit set with a drill. We will delve into the different types of drills, their specific uses, and the advantages over traditional methods. We’ll also compare different brands and explore the practical applications in both professional salons and home settings. Finally, we will discuss maintenance, safety, and troubleshooting to ensure optimal performance and a safe experience.
Product Overview
A professional acrylic nail kit with a drill offers a comprehensive solution for nail technicians seeking efficiency and precision in their work. These kits provide the tools needed to create various nail designs, from simple manicures to elaborate sculpted masterpieces. Understanding the components, types of drills, and advantages/disadvantages of using a drill is crucial for making informed decisions.This detailed overview provides a comprehensive understanding of professional acrylic nail kits with drills, including the various components, drill types, and their respective uses.
It also analyzes the advantages and disadvantages of using a drill compared to manual techniques, as well as a comparison of different brands available in the market.
Components of a Professional Acrylic Nail Kit
A complete professional acrylic nail kit with a drill typically includes a variety of essential tools. These tools range from the drill itself to different types of files, brushes, and materials. This ensures the technician has everything necessary for a complete nail service. Essential components frequently found in such kits include:
- The drill machine itself, with a range of drill bits for different tasks.
- A selection of acrylic powder and liquid for creating the nail enhancements.
- Different types of files and buffers for shaping and smoothing the nails.
- Cuticle pushers and nippers for proper cuticle care.
- A variety of brushes for applying acrylics and for detailing.
- Primer, top coat, and other finishing products to protect and enhance the nails.
Types of Drills in Acrylic Nail Kits
The drill is a crucial component in these kits. Different types of drills cater to specific needs and tasks in nail enhancement.
- High-Speed Drills: These drills are commonly used for shaping, sculpting, and removing acrylics. Their high speed enables quick and efficient work, particularly for large-scale projects. These are usually the standard for professional kits.
- Low-Speed Drills: Used for more precise work, such as intricate designs or shaping the nail edges. They offer more control and less chance of damage than high-speed drills.
- Rotary Drills: These drills have a variety of attachments that can be used for various purposes. They are often more versatile, enabling the technician to perform several functions with a single machine. This type of drill may offer better customization for specific tasks.
Manual vs. Drill-Based Acrylic Nails
Using a drill for acrylic nails offers significant advantages over traditional manual methods.
- Speed and Efficiency: Drills significantly reduce the time needed for shaping and removing acrylics, enhancing productivity. This is especially beneficial for high-volume nail salons.
- Precision and Control: Properly used, drills allow for greater precision in shaping and sculpting nails, leading to more consistent results. The control offered is often more accurate compared to manual techniques.
- Versatility: Drills can be used for various nail enhancements, including shaping, sculpting, and removal. This broad range of use can be particularly valuable in a professional setting.
- Disadvantages: The high speed of the drill can be a safety concern if not used correctly. Proper training and safety precautions are essential.
- Manual Methods: Manual methods still hold value in certain situations, offering more control for certain nail designs. They are also more accessible for beginners learning the trade.
Comparison of Acrylic Nail Kit Brands
The table below compares different brands of acrylic nail kits with drills, highlighting their price ranges and key features. This table can be a useful guide when choosing a suitable kit.
| Brand | Price Range (USD) | Key Features |
|---|---|---|
| Brand A | $150 – $250 | High-speed drill, various bit options, good quality materials. |
| Brand B | $250 – $400 | Low-speed and high-speed drill options, extensive accessories, higher quality motor. |
| Brand C | $300 – $500 | Rotary drill option, extensive training materials, durable construction. |
Features and Benefits
A professional acrylic nail kit with a drill offers significant advantages over a basic kit, particularly in terms of speed, precision, and the quality of the final product. This advanced setup empowers nail technicians to create intricate designs and achieve a professional finish, ultimately leading to a more satisfying client experience.The incorporation of a drill elevates the application process, enabling a faster and more efficient workflow compared to traditional manual techniques.
This increased efficiency allows nail technicians to handle more clients and maximize their productivity. The versatility of a drill-based kit is further enhanced by the wide array of drill bits available, allowing for a wider range of nail art styles.
Key Features of a Professional Kit
A professional acrylic nail kit with a drill usually includes a variety of high-quality tools, including a powerful electric drill, a range of drill bits for shaping, filing, and detailing, and an assortment of professional-grade acrylic powder and liquid. These features, when combined, contribute to a more professional and efficient work process. The difference is apparent in the precision and speed of the application.
Benefits of Using a Drill for Acrylic Nails
The use of a drill for acrylic nail application provides significant benefits, including increased speed, enhanced precision, and a higher quality of results. The drill’s controlled rotation allows for precise shaping and detailing, resulting in more consistent and aesthetically pleasing nail designs. The reduced time spent on each step of the application process also contributes to greater efficiency and higher productivity.
Drill Bits and Nail Design
A diverse selection of drill bits is crucial for crafting intricate nail designs. Different bits are specialized for specific tasks, such as creating precise lines, shaping the nail, removing imperfections, and creating various textures. For example, a fine-tip drill bit can create intricate patterns, while a larger-diameter bit is ideal for shaping the nail bed and removing excess acrylic.
Ease of Use for Beginners
While a drill-based kit might seem intimidating at first, proper training and practice can make it as easy as a traditional kit. Detailed instructions, tutorials, and videos often accompany professional kits to guide beginners through the process. The precision and speed offered by the drill, once mastered, can often outweigh the initial learning curve.
Types of Acrylic Powder and Liquid, Acrylic nail kit set professional with drill
Various types of acrylic powder and liquid are available for use with these kits. The choice depends on the desired results, such as durability, flexibility, or color. Acrylic powders come in a wide range of shades and colors, while liquids typically offer different viscosity levels. Matching the powder and liquid formulations is key to achieving the desired finish and longevity of the nails.
Usage and Techniques: Acrylic Nail Kit Set Professional With Drill
Mastering acrylic nail application with a drill requires a combination of precision, technique, and safety precautions. This section provides a comprehensive guide to setting up, operating, and using a nail drill for acrylic applications, ensuring professional results while prioritizing safety.
Setting Up and Operating the Nail Drill
Proper setup and operation are crucial for efficient and safe acrylic nail application. Begin by ensuring the work area is well-lit and organized. Position the drill securely on a stable surface, ensuring it’s not wobbly or prone to slippage. Connect the drill to a reliable power source, checking for any potential power fluctuations that might affect the drill’s performance.
Always follow the manufacturer’s instructions for specific setup procedures and safety recommendations.
Drill Techniques for Shaping and Smoothing Acrylic Nails
Using a nail drill for shaping and smoothing acrylic nails requires careful consideration of speed and pressure. For shaping, start with a lower speed setting to avoid damaging the acrylic or the natural nail. Gradually increase the speed as needed to achieve the desired shape. Use a fine-grit bit for smoothing and polishing the acrylic surface. Remember to apply even pressure to avoid creating uneven surfaces.
Safety Precautions When Using a Nail Drill
Safety is paramount when working with a nail drill. Ensure you wear appropriate protective gear, such as safety glasses or goggles, to shield your eyes from flying debris. Use a sturdy work surface to prevent the drill from slipping or wobbling. Always maintain a firm grip on the drill, and avoid any unnecessary movements. Ensure the area is well-ventilated to prevent the accumulation of dust or fumes.
Never operate the drill if any part of it is damaged or malfunctioning. When using the drill, always keep your fingers and hands well away from the rotating bit.
Acrylic Application Techniques Using a Drill
A nail drill can be instrumental in various acrylic application techniques, such as sculpting and intricate design creation. For sculpting, use a variety of drill bits to shape the acrylic, creating different textures and forms. For intricate designs, use specialized drill bits to create patterns or embellishments on the nail. These techniques can elevate the artistry and aesthetic appeal of the finished acrylic nails.
Drill Speed and Settings for Acrylic Nail Applications
The appropriate drill speed and settings vary depending on the specific acrylic application. The table below provides a general guideline for different acrylic nail applications.
| Application | Drill Speed (RPM) | Bit Type | Comments |
|---|---|---|---|
| Initial Shaping | Low (1000-2000) | Coarse | Avoid excessive pressure to prevent damaging the natural nail. |
| Smoothing | Medium (2000-3000) | Medium/Fine | Ensure a smooth surface. |
| Sculpting | Medium (2000-3000) | Sculpting | Focus on precision and control. |
| Detailing/Design | High (3000-5000) | Small, Specialized | Maintain a steady hand to avoid damage. |
Professional Applications
Professional acrylic nail kits with drills are indispensable tools in the modern nail salon. These kits elevate the artistry and efficiency of nail technicians, enabling them to create intricate designs and deliver exceptional customer experiences. Understanding the distinctions between professional and home use kits is crucial for maximizing performance and longevity.The professional-grade acrylic nail kits with drills are built for continuous, high-volume use, contrasting with home kits designed for occasional or personal application.
Professional kits are often equipped with more powerful motors and durable components, ensuring consistent performance and longevity. This allows nail technicians to provide consistently high-quality services to their clients.
Differences in Professional and Home Use Kits
Professional kits are designed for intensive use in salons. These kits are engineered for prolonged operation with robust motors, ensuring consistent speed and power output for diverse nail treatments. Conversely, home kits prioritize portability and ease of use, often sacrificing some performance for affordability. The key difference lies in the power output and durability, directly impacting the technician’s ability to execute intricate designs and the longevity of the equipment.
This professional acrylic nail kit with drill is a dream come true for any nail technician. The smooth, precise application feels like magic under my fingertips. After a long day of perfecting manicures, there’s nothing quite like the satisfying crunch of a perfectly crafted nail, and sometimes, to reward myself, I indulge in a delicious feast at Big Daddy’s Pizza Steak Subs & Burgers big daddy’s pizza steak subs & burgers.
The perfect combination of savory flavors and a satisfying meal fuels my passion for creating beautiful nails. Now, back to the artistry of this amazing acrylic nail kit set!
Durability and Power in Professional Kits
Professional kits prioritize durability and power. The motors are more powerful, capable of handling the demands of frequent use and various tasks. The components are constructed from high-quality materials, resisting wear and tear. This resilience translates into a longer lifespan, reducing downtime and maintenance costs for the salon.
High-End Nail Art Designs with Drills
Nail technicians utilize acrylic nail kits with drills to execute elaborate nail art. The precision and speed of the drill enable them to create intricate designs, from detailed floral patterns to shimmering 3D effects. They can shape and sculpt nails with exceptional precision, adding intricate details to enhance the aesthetic appeal. The consistent power output of the professional drill allows technicians to complete these complex designs without compromising the quality or timeliness of their service.
Efficiency and Customer Satisfaction
Drills significantly enhance efficiency in professional nail salons. The speed and precision of the drill allow technicians to complete manicures and elaborate nail art designs faster, enabling them to accommodate more clients within a given time frame. This efficiency directly contributes to customer satisfaction, as clients receive timely and high-quality services.
A professional acrylic nail kit set with drill is a dream come true for any nail technician. The precision and control it offers are simply unmatched, and the possibilities feel endless. Imagine the confidence you’d feel gliding your drill across a nail, transforming it into a work of art. The thrill of creating perfect manicures with a 2019 Mazda CX-5 Grand Touring Reserve ( 2019 mazda cx-5 grand touring reserve ) as your trusty companion, driving you to clients, fueling your passion for the craft.
This exquisite kit set will make you feel like a true artist, transforming hands into breathtaking masterpieces.
Maintenance and Care of the Kit
Maintaining the drill and other components of the professional acrylic nail kit is vital for longevity and optimal performance. Regular cleaning and maintenance prolong the life of the equipment and prevent potential damage. Proper cleaning procedures, as detailed in the manufacturer’s instructions, are essential for preventing premature wear and tear. Following these guidelines will ensure consistent performance and maximize the return on investment.
Comparison and Alternatives
Choosing the right nail enhancement method depends on several factors, including skill level, desired results, and budget. Acrylic nail kits with drills offer a powerful combination of precision and speed, but other methods like gel or dip powder also have their own advantages. Understanding the strengths and weaknesses of each approach is crucial for making an informed decision.Acrylic nail kits with drills are often favored for their versatility and ability to create intricate designs, while gel and dip powder techniques are frequently preferred for their relatively faster application time and ease of maintenance.
The target audience for each type of kit varies based on these factors.
Acrylic vs. Gel
Acrylic nails, when combined with a drill, offer exceptional sculpting capabilities. This precision allows for a wider array of designs, from intricate floral patterns to sharp geometric shapes. However, the process requires more time and skill compared to gel. Gel nails, on the other hand, are known for their quick application and durability, which makes them suitable for clients seeking faster service.
The speed and relative ease of application make gel a more accessible option for beginners.
Acrylic vs. Dip Powder
Acrylic kits with drills excel in intricate detailing, while dip powder offers a smooth, even finish that’s often quicker to apply. Dip powder is ideal for beginners due to its forgiving nature and ease of use. The application process of dip powder can be quicker than acrylic, making it a popular choice for salons looking to maximize efficiency.
Acrylics, with their drill-assisted sculpting, are better suited for creating unique and highly detailed designs, which may require more advanced skills and time.
Target Audience for Each Method
| Method | Target Audience | Advantages | Disadvantages |
|---|---|---|---|
| Acrylic with Drill | Experienced nail technicians, those seeking intricate designs, professionals needing high durability | High detail and customization, long-lasting results | Requires more skill and time for application, potentially more expensive for clients |
| Gel | Beginners to experienced technicians, those seeking faster application time | Quick application, durable finish | Less customization options compared to acrylics, can be more challenging to achieve certain designs |
| Dip Powder | Beginners to intermediate technicians, those looking for a balance between speed and durability | Relatively easy to learn, forgiving application | Can be more challenging to create intricate designs, may not last as long as acrylics in specific situations |
Nail Designs Achievable with Acrylics
A significant advantage of acrylic nail kits with drills is the ability to create a wide variety of designs. These designs can range from the classic stiletto to more elaborate 3D designs. Consider examples like intricate floral patterns, detailed geometric shapes, or even miniature landscapes. These designs are not readily achievable with other methods without specialized tools and significant skill.
Long-Term Effects of Using a Nail Drill
Using a nail drill for acrylic applications can, if performed correctly and with proper safety precautions, provide long-term results. However, excessive use or improper technique can lead to potential damage to the natural nail bed. The key is to use the drill with appropriate care and to maintain regular nail maintenance. This involves regular nail trimming and moisturizing to prevent the long-term effects of excessive use of the drill.
Maintaining healthy nail hygiene, including proper nail care routines, is crucial.
Maintenance and Care
Proper maintenance is crucial for extending the lifespan of your acrylic nail kit with a drill and ensuring optimal performance. Regular cleaning and care not only prevent premature wear but also maintain the safety and hygiene of your tools. A well-maintained kit will save you time and money in the long run by reducing the need for frequent replacements.Maintaining your acrylic nail kit with a drill involves a series of steps to keep its components clean, functional, and safe.
This includes thorough cleaning of the drill, its accessories, and the surrounding workspace. Regular inspection and storage also play a key role in preventing damage and ensuring longevity.
Cleaning the Drill and Accessories
Regular cleaning prevents build-up of acrylic dust, debris, and other contaminants that can hinder the drill’s performance and potentially damage its internal components. Disassemble the drill according to the manufacturer’s instructions to access all parts for thorough cleaning. Use a soft brush to remove any visible debris. Use a specialized cleaning solution for electronics and gently wipe down the motor and housing, ensuring not to immerse the motor in water.
Cleaning the Workspace
Maintaining a clean workspace is critical for preventing cross-contamination and ensuring the longevity of your acrylic nail kit. Use a disinfectant solution to wipe down surfaces regularly to remove dust, debris, and potential contaminants. A clean environment promotes hygiene and prevents the spread of bacteria or fungi.
Proper Storage
Proper storage is essential to prevent damage and extend the lifespan of your tools. Store the drill and its accessories in a designated, dry area. Use a protective case or cover to shield components from dust, moisture, and physical damage. Organize components in a way that makes them easy to find and prevents accidental damage during storage.
Troubleshooting Common Issues
Occasionally, issues can arise with your acrylic nail drill or other components. If the drill is not functioning properly, first check the power source. Ensure the drill is properly plugged in and that the power supply is working correctly. If the issue persists, consult the manufacturer’s troubleshooting guide. If the problem is still not resolved, contact a qualified technician for assistance.
Disposing of Used Drill Bits and Components
Proper disposal of used drill bits and other components is vital for environmental sustainability and safety. Dispose of used drill bits in designated sharps containers, as some may contain sharp or potentially hazardous materials. Check local regulations for proper disposal procedures. Follow guidelines to minimize the environmental impact of waste disposal.
Tools Needed for Maintenance
- Soft-bristled brush for cleaning components.
- Specialized electronic cleaning solution (suitable for the drill motor).
- Disinfectant solution for cleaning the workspace.
- Protective case or cover for storing the kit.
- Designated sharps container for used drill bits (and other components as needed).
Proper maintenance and care will not only extend the life of your acrylic nail kit but also improve its performance, ensuring your work remains efficient and professional.
Safety and Considerations
Proper safety procedures are paramount when working with acrylic nail kits and drills. Ignoring safety precautions can lead to severe injuries, including burns, cuts, and eye damage. Understanding the potential hazards and implementing appropriate safety measures protects both the user and those around them.Using a nail drill requires meticulous attention to detail and a commitment to safety protocols.
Failure to adhere to these guidelines can result in avoidable accidents. By understanding the risks, implementing the necessary precautions, and employing appropriate safety equipment, users can significantly reduce the likelihood of harm.
Importance of Safety Measures
Ensuring the safety of both the user and those around them is critical. Improper use of the nail drill and associated materials can result in serious injuries. Following safety procedures minimizes the risk of accidents and protects everyone involved in the process.
Risks and Precautions
Several risks are associated with using a nail drill, including the potential for eye injuries, burns, and cuts. Precautions such as wearing safety glasses and gloves are crucial for protecting against these hazards. Furthermore, using the drill on a stable surface and maintaining a secure grip on the drill are essential to avoid accidents. Working in a well-ventilated area is also important to prevent inhaling harmful dust particles.
Required Safety Equipment
Comprehensive safety equipment is essential for minimizing risks associated with nail drill use. This includes:
- Safety Glasses or Face Shield: Protecting the eyes from flying debris is paramount. A face shield provides wider protection than standard safety glasses and should be considered for added security.
- Protective Gloves: Gloves safeguard the hands from cuts, burns, and exposure to chemicals in the acrylic materials. Durable, well-fitting gloves are crucial.
- Protective Apron or Clothing: A protective apron or clothing prevents accidental splashes of materials from staining or damaging clothing. Consider a dedicated work apron specifically for nail procedures.
- Dust Mask or Respirator: Inhaling dust particles from the acrylic materials can be harmful. A dust mask or respirator, chosen based on the specific materials used, filters out harmful particles, preventing respiratory issues.
Potential Hazards
Potential hazards associated with the acrylic nail kit include:
- Material Splashes: Splashes of acrylic monomer or powder can cause skin irritation or burns, particularly if not handled carefully.
- Drill Breakage: Drill breakage can lead to injuries if the fragments are propelled into the user’s eyes or skin. Regular maintenance and inspection of the drill are essential.
- Overheating: Overheating of the drill can result in burns. Regular breaks and proper ventilation are essential to prevent this.
- Sharp Tools: Nail files and other sharp tools can cause cuts or lacerations if not handled carefully.
- Improper Nail Preparation: Improper nail preparation, such as using too much pressure or using the wrong tools, can damage the nail and lead to infection or discomfort.
Proper Disposal Procedures
Proper disposal of used materials is crucial for environmental protection and minimizing potential health risks.
- Waste Disposal: Acrylic monomer, powder, and other used materials should be disposed of according to local regulations. Check with your local waste management facility for guidelines.
- Sharps Disposal: Used nail files and other sharp tools should be disposed of in designated sharps containers. Do not mix sharps with other waste materials.
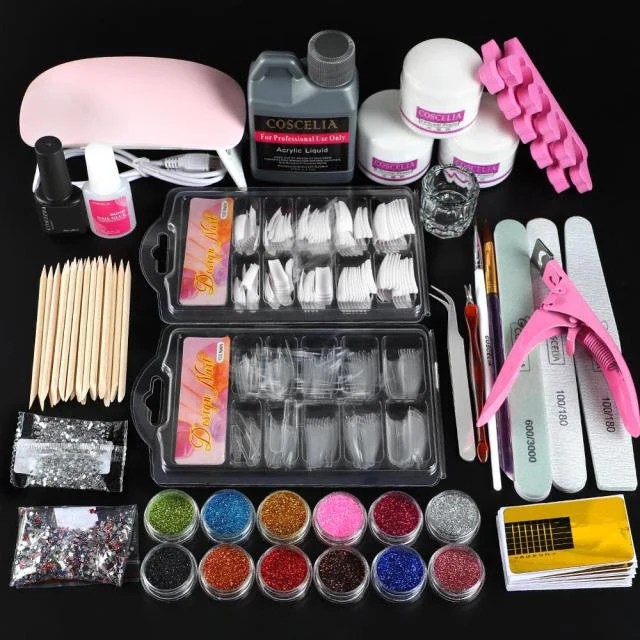
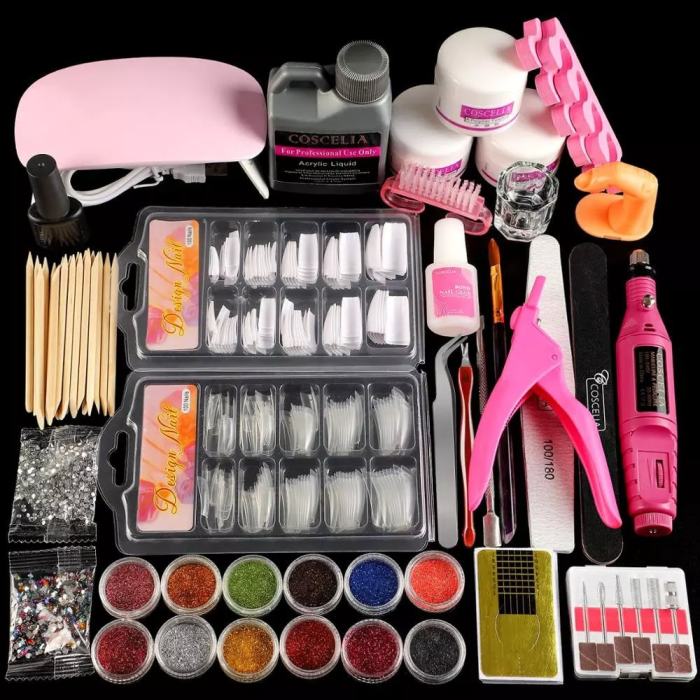
Image Descriptions
This section provides visual representations of a professional acrylic nail kit with a drill, its components, and their applications. Understanding the appearance and functionality of each tool and material is crucial for mastering acrylic nail techniques. Detailed descriptions of the tools and materials will help nail technicians and enthusiasts visualize the process and ensure proper use.
Appearance of the Professional Acrylic Nail Kit
A professional acrylic nail kit with a drill typically includes a variety of components, often housed in a sturdy carrying case. The color scheme may vary, but common choices include sleek, neutral colors like black, gray, or metallics, to enhance the professional aesthetic. The kit usually comprises a nail drill, a variety of drill bits, acrylic powder in different shades and textures, various nail forms, and an assortment of acrylic liquids.
The quality of the kit is often indicated by the precision and durability of the components.
Drill Bits and Their Shapes
Different drill bits are designed for various tasks. The kit likely contains a selection of bits, including:
- Flat/Round Burs: These are commonly used for shaping and smoothing the natural nail. Flat burs are used for shaping the nail bed, while round burs are employed for smoothing and polishing. The size and shape of the bur determines the level of detail achievable.
- Cone-shaped Burs: These bits are excellent for creating intricate details and curves on the nail surface. Their tapered shape enables precise control and manipulation, allowing for detailed carvings and intricate nail art.
- Diamond Burs: These burs are ideal for smoothing and polishing acrylic, removing imperfections and achieving a high gloss finish. The grit of the diamond bur determines the level of smoothness achieved.
- Other specialized burs: The kit might include specialized burs for specific nail art applications, such as those designed for creating patterns, textures, or intricate designs. These could include smaller, more pointed or specialized-shaped burs.
Acrylic Powder and Liquid Textures
The acrylic powder and liquid components are crucial to the process. The powder typically comes in a variety of colors and opacities, ranging from translucent to opaque, and can affect the final look of the nails. The liquid, which usually comes in a bottle, determines the viscosity and bonding properties of the acrylic mixture. The appearance of the powder can vary in texture, from fine and smooth to slightly coarse, and the liquid’s color might range from clear to slightly tinted.
These variations influence the final texture and appearance of the acrylic nails.
Nail Designs and Detail
The acrylic nail kit can be used to create a wide range of nail designs, from simple and elegant to elaborate and complex. Examples include:
- French manicures: Classic and versatile, French manicures use a contrasting tip color to create a natural and elegant look. The precision of the application of the acrylic powder and liquid is critical to achieve the desired tip shape.
- Gradient nails: These designs showcase a smooth transition between different colors, often using multiple shades of acrylic powder. The smooth blending of colors is achievable with precise technique and controlled use of the drill bit.
- 3D nail art: Using the drill bit to carve or sculpt the acrylic can create 3D elements on the nails, such as flowers, crystals, or other intricate designs. The level of detail depends on the skill of the technician and the tools used.
Proper Use of the Nail Drill
Proper use of the nail drill is critical for both safety and effectiveness. The following steps illustrate proper procedure:
- Prepare the workspace: Ensure a clean and well-lit workspace. This includes proper ventilation to avoid inhaling dust and fumes.
- Choose the appropriate drill bit: Select the correct drill bit for the task at hand, ensuring it’s the right size and shape.
- Secure the nail: Hold the nail securely during the drilling process, ensuring the nail doesn’t move.
- Maintain controlled speed: Control the speed of the drill bit, especially when working on the natural nail or acrylic layer. Avoid excessive speed or pressure to prevent damage to the natural nail or the acrylic structure.
- Regularly inspect: Monitor the nail during the drilling process to ensure the desired shape and avoid unnecessary damage to the nail or acrylic.
Troubleshooting Guide
Proper maintenance and understanding of potential issues are crucial for maximizing the lifespan and effectiveness of your acrylic nail kit with drill. Addressing problems promptly can save time, effort, and potentially costly repairs. This guide details common problems, their causes, and solutions, ensuring a smoother and more successful experience.
Common Problems and Solutions
Troubleshooting is a vital part of any craft. Knowing the possible causes and solutions to common problems with your acrylic nail kit with drill will save you time and frustration. By understanding the potential issues, you can proactively address them and maintain the integrity of your work.
- Uneven Nail Thickness: Uneven acrylic nail thickness can stem from inconsistent application of the acrylic powder and liquid mixture, improper use of the drill, or variations in the nail bed. Ensuring a consistent application technique, using the drill at the correct speed and pressure, and carefully checking the nail bed for any irregularities can help prevent this issue.
- Acrylic Powder Caking: Caked acrylic powder can hinder proper mixing and application, potentially resulting in uneven texture and weak bonds. Using a high-quality acrylic powder and liquid, and thoroughly mixing the components before application are key to preventing caking. Also, ensure the mixing bowl and tools are clean and dry to prevent buildup.
- Drill Motor Issues: Problems with the drill motor, such as reduced speed or sudden stops, might be caused by overheating, insufficient power supply, or clogged vents. Regular cleaning of the drill’s vents and maintaining a proper power supply can mitigate these problems. If the issue persists, consult the manufacturer’s guidelines or a qualified technician.
- Acrylic Cracking or Peeling: Cracks or peeling acrylics could indicate improper application techniques, insufficient curing time, or inadequate nail preparation. Ensuring sufficient curing time, adhering to proper application techniques, and ensuring a properly prepared nail bed can help avoid these problems. Check the manufacturer’s recommendations for the appropriate curing time and application methods.
- Overheating of the Drill: Overheating of the drill can be caused by prolonged use without breaks or insufficient ventilation. Allowing the drill to cool down between sessions and ensuring adequate ventilation can help prevent this issue. Use of the drill for extended periods without interruption can lead to overheating.
Troubleshooting Table
This table summarizes common issues, their potential causes, and recommended solutions for quick reference.
| Common Issue | Possible Cause | Solutions |
|---|---|---|
| Uneven Nail Thickness | Inconsistent application, incorrect drill speed/pressure, uneven nail bed | Use a consistent application technique, adjust drill speed and pressure, prepare the nail bed meticulously |
| Acrylic Powder Caking | Low-quality product, insufficient mixing, dirty mixing bowl/tools | Use high-quality acrylic powder and liquid, thoroughly mix the components, ensure clean and dry mixing tools and bowl |
| Drill Motor Issues | Overheating, insufficient power, clogged vents | Allow the drill to cool down, ensure a proper power supply, clean the drill’s vents regularly |
| Acrylic Cracking or Peeling | Improper application, insufficient curing time, inadequate nail preparation | Follow proper application techniques, ensure sufficient curing time, and prepare the nail bed adequately |
| Overheating of the Drill | Prolonged use without breaks, insufficient ventilation | Allow the drill to cool down between sessions, ensure adequate ventilation during operation |
Seeking Assistance
If the problem persists after trying the suggested solutions, seeking professional help is advisable. Contact the manufacturer’s customer support or a qualified nail technician for further assistance. They can provide personalized guidance and help diagnose the underlying cause of the issue. In some cases, a qualified technician may be able to offer specific techniques or insights tailored to your unique situation.
Concluding Remarks
In conclusion, a professional acrylic nail kit set with a drill provides a powerful and versatile option for enhancing nails. This guide has highlighted the diverse features and benefits of this type of kit, emphasizing the importance of proper technique, safety, and maintenance. By understanding the different aspects of this kit, both professionals and beginners can effectively use it to achieve high-quality results while maintaining a safe environment.
Remember to prioritize safety and practice proper techniques to maximize the potential of this tool.
Query Resolution
What are the common safety precautions when using a nail drill?
Always wear safety glasses or a face shield, use appropriate hand protection, and ensure the work area is well-ventilated. Follow the manufacturer’s instructions carefully and be mindful of the drill’s speed settings.
What are the differences between professional and home use kits?
Professional kits typically offer higher power and durability compared to home use kits. They may include more advanced features and a wider range of drill bits. The materials used for professional-grade kits are often more resilient and resistant to wear and tear.
How do I properly dispose of used drill bits?
Consult local regulations for proper disposal of used drill bits. Some materials might need specific handling or disposal methods.
What are the long-term effects of using a nail drill compared to manual methods?
Overuse of a nail drill can lead to hand fatigue and potential discomfort. However, it significantly speeds up the process, allowing for more precise results. Proper technique and breaks can mitigate the potential drawbacks.
